Supplies
1 hen's, duck, goose, or ostrich egg
Hot melt glue gun
Small amount of hot melt glue
Spray paint, preferrably black, red, green, gold or silver
Small amount of acrylic paint in black or dark brown
Very sharp craft knife
Scissors, or a pair of wire cutters
Gold rubbing paste, contrasting acyrlic paint or luminous gel pen
Instructions
Wash the egg quickly in cold, slightly soapy water.
Make a hole in both ends of the egg by placing the point of the tip of the blade against the tip of the egg at one end and turning backand forth about 180 degrees each turn. It will take quite a while to get started, but don't be tempted to push to hard or you will break the egg.
Author's Note:If you feel that you are not getting started, then carefully scratch a cross at the end and put the tip of the blade at the centre of the cross and go back to turning it back and forth.
Once breaking through, make sure to still take care as the blade can bite in and chip or crack the egg.
After 5 minutes or so of turning there will be a hole about the size of a drinking straw. A hole anywhere between the diameter of a cocktail stick and drinking straw is fine.
Don't worry if a little is chipped away, the hotmelt glue will cover it in due course.

Poke a cocktail stick into the holes at the end of the egg and break the yolk sack.
In relation to the size of the hole, and while gently holding the egg, blow hard through one end of the egg catching the white and yolk in a suitable bowl or jug as they come out the other end.
Once all the egg white and yolk is evacuated, run the egg under the cold tap to clean out the inside as much as possible.
Fill your mouth with water and blow that through the egg as well, to make sure you remove all traces of its' previous contents.

Put some hot melt glue on the end of a cocktail stick and gently push it into the egg at one end so that most of it sticks out.
Hold it until the glue is set and add a little more hot melt glue on the outside if necessary, still remembering to handle the egg gently.

Using hot melt glue, draw some features on the egg in any desired pattern by drawing loops around the upper half of the egg while rotating it.
Then join the top of the loops to the top of the egg with straight (more or less) lines.
After this, join the bottom of each of the loops to the bottom tip of the egg by the cocktail stick with wavy lines.

Spray paint the egg the desired color, sticking the end of the cocktail stick into something sturdy to hold the egg upright as it dries.

Distress the egg by painting on black or dark brown acrylic paint and wiping it off while it is still wet, taking care to allow the paint to remain in all of the crevices.
Repeat this process until you are satisfied with the results.

Using gold rubbing paste, add surface highlights to the raised portions of the egg.
Author's Note: This is an optional step. however, adding those last few details is great fun and does make the Dragon's Egg look really special. A bit of contrasting paint on the finger tip or a luminous gel pen, can also be used.

Using scissors or a pair of wire cutters, carefully cut off the cocktail stick as close as possible to the base.

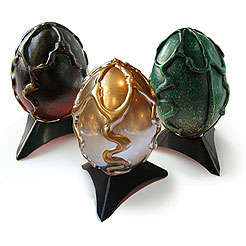
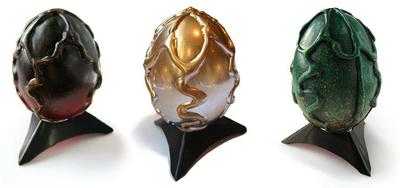
Final Product
Credit
© Chris Barnardo's tutorial was taken with permission from dadcando.com. Here he also has tutorials for a stand for your egg and an antique mailing box!