Supplies
5 skeins of New Lanark Mills DK wool in blueberry, or 250g of any DK weight wool
1 skein of Texere Glitter yarn in silver, or 100g of any silver metallic fingering weight yarn
US5 32" (3.75 mm 81.28 cm) circular needle
US5 (3.75 mm) DPNs
US5 (3.75 mm) straight needles
Waste yarn
Darning needle
2 stitch markers
Fabric to line the bag
Scissors
Gauge
21 stitches and 29 rounds per 4" (10.16 cm)
Final Measurements
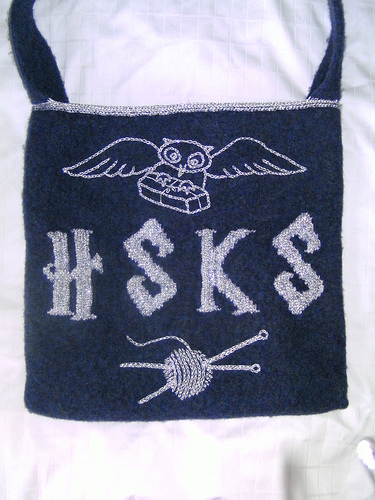
Post felting the main square of the bag measures 14" (35.56 cm).
Charts
Chart 1
Click on the picture for a full-sized image.
 Chart 2
Click on the picture for a full-sized image.

Embroidery Motifs
Embroidery Motif 1
Click on the picture for a full-sized image.
 Embroidery Motif 2
Click on the picture for a full-sized image.

Instructions
Charted bag
- Using a provisional cast-on, the circular needle, the blue wool (MC) and waste yarn CO 200 sts.
- Leave at least 1 yard of yarn as a tail joining the bottom seam, winding it onto a bobbin to keep it tidy during the knitting, if preferred.
- Join for knitting in the round, making sure not to twist your sts, and knit 15 rounds in stockinette stitch, placing a stitch marker at the beginning of the round and after 100 sts to mark the edges of the bag.v
- Work Chart 1 for one side of the bag, and Chart 2 for the other, using the silver yarn (CC) with two strands held together for the lettering. Author's Note: The lettering on the bag is knitted using stranded technique. Because of the very slippery character of the metallic yarn the bag
shown was knitted with floats of only 3 stitches. - Some of the rounds between lines of text have no stitches worked in CC. For these rounds, and the last 15 rounds of the main bag section, do not carry the metallic yarn behind MC.
- Do not bind off.
- Join the front and back bottom edges of the bag together with kitchener stitch, placing the provisional stitches onto the straight needles to do so.
Edging
- Cast on 4 sts using DPNs and 2 strands of CC together.
- Work an I-cord as usual, except that the 4th stitch of each row is slipped knit-wise and one stitch from the top of the bag is also slipped knit-wise onto the needle, then both stitches are knitted together as when working a SSK decrease.
- Knit and apply the I-cord in this manner all around the top of the bag, then break off the yarn leaving a 12" (30.48 cm) tail.
- Use this tail to sew the last row of I-cord stitches to the base of the cast-on stitches in as neat a manner as possible.
Strap
- Pick up 24 sts from the top of the I-cord edging at one side edge, taking 12 sts from each side of the bag adjacent to the edge.
- Knit these stitches back and forth in K1, P1 ribbing until the strap measures 50" (1.27 M).
- Evenly pick up 24 stitches from the top of the I-cord at the other side edge as before.
- Graft the strap sts to these picked up stitches using kitchener stitch.
- Weave in all ends.
Felting & embroidery
- Felt the bag using your method of preference. The bag shown was felted in a front-loading washing machine on the hottest cycle.
- The embroidery motifs are applied freehand in chain stitch, except for the parcel string which is worked in long stitch.
- The motif outlines are provided for general reference. Do not aim to copy them exactly, instead aiming for a result which approximates the pictures to your satisfaction.
Finishing
Trim away any pulls and unwanted fibers from the bag with scissors.
Block the bag lightly, if desired.
Line the bag with the material of your choice.
Final Product


Credit
Ann Kingstone's tutorial was taken with permission from Ravelry. Also be sure to check out Anna's patterns for sale at her Etsy store.